Seamless Scheduling with Auto Forward: Find Open Calendar Slots Instantly
Scheduling is at the heart of most businesses, whether it’s for consultations, short or long meeting durations, or even service appointments. Yet, navigating a calendar to find your preferred time slot can sometimes feel like a tedious task, especially when no immediate times are open. At Zapiy, we believe in making every process as seamless as possible. That’s why we’re excited to introduce our latest CRM enhancement, an appointment slots feature—Auto Forward on Calendars to Find the Next Open Slot.
This game-changing feature eliminates the need for manual navigation between months, allowing your calendar to automatically scroll to the next unoccupied time slot. It’s about proper time management, reducing frustration, and delivering a smoother experience for you and your clients.
Let’s explore how this feature works, why it matters for your business, and how you can maximize its potential.
Seamless Scheduling with Auto Forward: Find Open Calendar Slots Instantly
Why Does Auto Forward Matter to Your Business?
How to Use Auto Forward on Calendars to Find the Next Open Slot
2. Locate and Select Your Calendar
3. Edit Calendar Settings and Availability
4. Customize Availability with Specific Dates and Times
5. Save Your Changes to Update the Calendar Automatically
7. Test the Scheduling Link and Verify Updates
Additional Benefits of Auto Forward
1. Sync with Team Availability
Tips for Optimizing Your Calendar Widget
Why Does Auto Forward Matter to Your Business?
Scheduling isn’t just a mundane task—it’s often the first interaction your clients have with your business. A seamless scheduling process can leave a positive first impression, while a clunky one can deter potential customers. Here’s how the Auto Forward feature addresses common pain points:
1. Effortless Scheduling
Gone are the days of endlessly clicking through weeks or months to find an unoccupied time slot. With Auto Forward, the calendar intuitively skips occupied slots and jumps to the next available time for interactive meeting and provide accurate responses for appointment availability, saving time and effort for both you and your clients.
2. Enhanced User Experience
By eliminating the hassle of manual navigation, you provide a smoother, frustration-free experience. Clients can focus on choosing a time that works for them without the distraction of figuring out how to find one.
3. Improved Conversion Rates
A streamlined scheduling process translates to fewer drop-offs. If clients can quickly find and book a preferred time slot, they’re less likely to abandon the process, increasing your professional booking conversion rates.
4. Competitive Edge
Not every business invests in intuitive scheduling tools. By offering this feature, you position your business as forward-thinking, tech-savvy, and client-focused—all qualities that set you apart in a competitive marketplace.
How to Use Auto Forward on Calendars to Find the Next Open Slot
With the new Auto Forward functionality in our CRM, scheduling becomes more intuitive and efficient. Follow these detailed steps to learn how to set up your calendar and take full advantage of this feature. Each step is designed to ensure your calendar is fully optimized for a seamless experience for you and your clients.
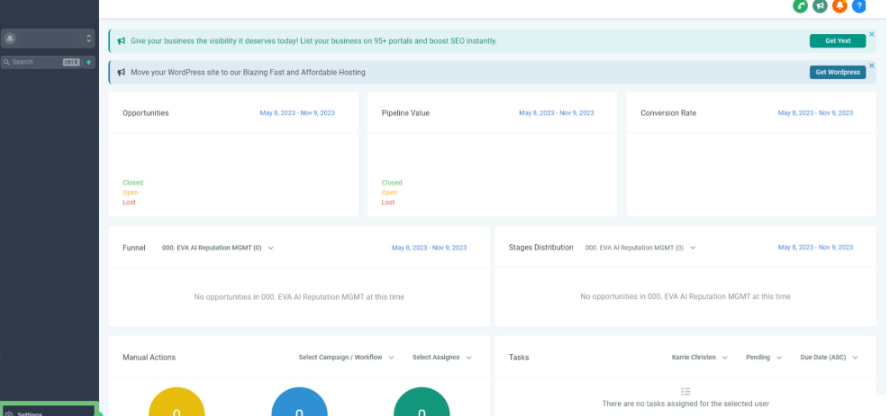
1. Access Your CRM Account and Navigate to Settings
To get started, log in to your CRM account. On the bottom-left corner of the dashboard, locate the “Settings” option. This is the gateway to configuring all your tools and features.
Once you click on “Settings,” you’ll notice a new left-hand menu appear on your dashboard. From here, you’ll have access to all the core configuration options for your CRM. The system is designed to be user-friendly, ensuring you can quickly make adjustments as needed.
2. Locate and Select Your Calendar
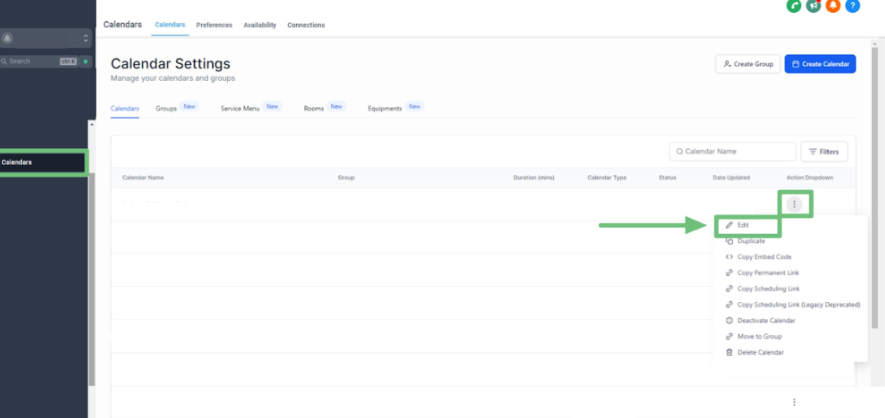
In the left-hand menu under “Settings,” scroll down to find the “Calendars” option. Click on it to open the Calendars section.
Here, you’ll see a list of all the calendars you’ve created. Identify the calendar you want to work on. This could be a personal calendar for meetings, a team calendar for collaborative tasks, or a service-specific calendar for client bookings.
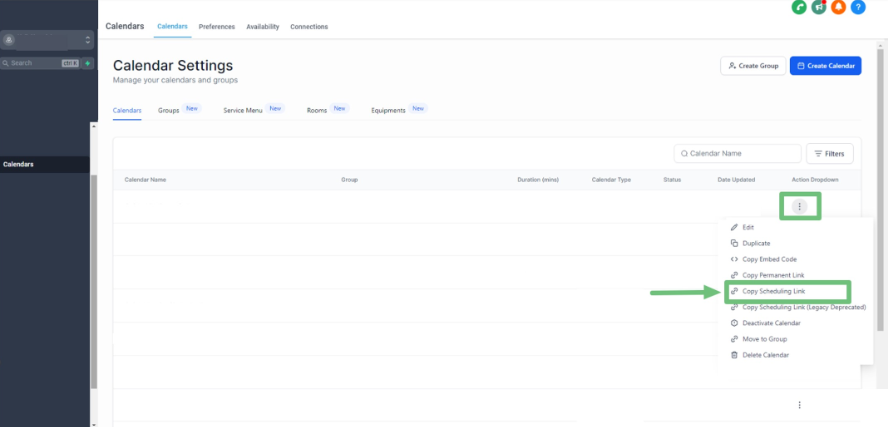
Next to the calendar you want to modify, look for the three dots located on the right-hand side. This is your action menu. Click on the three dots and select “Edit” from the dropdown menu.
3. Edit Calendar Settings and Availability
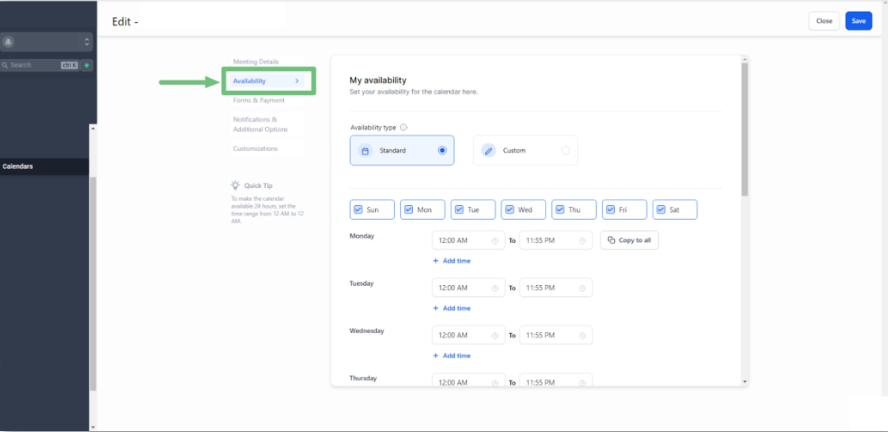
After clicking on “Edit,” a new interface will appear. This is where you’ll configure the calendar’s availability and other key settings.
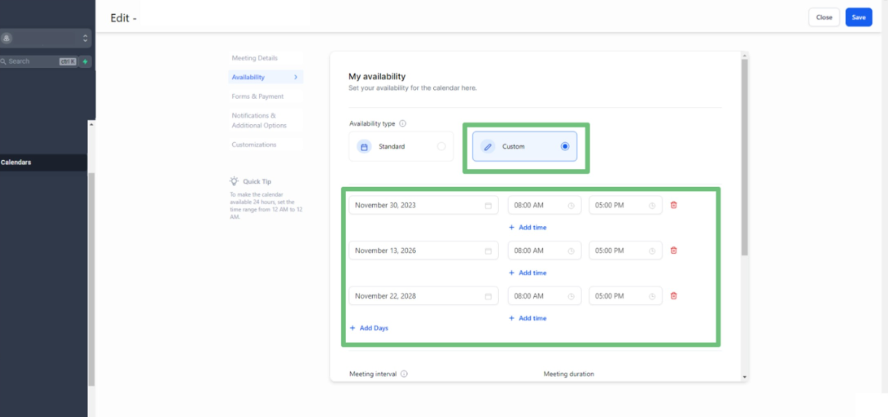
Focus on the top-left corner of the screen, where you’ll find the “Availability” tab. Click on it to access your time choice availability settings. This is where you can set the times and dates you are available for appointment or meetings.
4. Customize Availability with Specific Dates and Times
Once in the “Availability” section, you’ll notice a few options. Select the “Custom” option to manually define the specific dates and times you want to display as available on your calendar.
This is a powerful feature, especially for those with varying schedules. You can pick specific days and block off times for meetings, events, or client calls. For example, you can show availability only on weekdays from 9 AM to 5 PM or block out personal time during certain hours.
A menu will appear under the “Custom” option, where you can precisely define your schedule. Add as many time slot choices as necessary to reflect your real-time availability. This level of control ensures that your calendar is never overbooked or inaccurately displayed to clients.
5. Save Your Changes to Update the Calendar Automatically
Once you’ve finished customizing your availability, look toward the top-right corner of the screen. You’ll see the “Save” button. Click it to save all the adjustments you’ve made.
Saving your changes updates the calendar in real time, ensuring anyone accessing it will see the most current availability. This prevents miscommunication and ensures smooth scheduling for you and your clients.
6. Copy the Scheduling Link
After saving your changes, you’ll be redirected back to the main Calendars page, where you can see all your calendars listed. Find the calendar you just updated.
Next to it, click on the three dots action menu once again. This time, select the “Copy Scheduling Link” option.
This step is for links generation that provides you a unique URL for your calendar. It’s an essential link that you can share with clients, colleagues, or anyone who needs to book time with you.
7. Test the Scheduling Link and Verify Updates
Open a new tab in your browser and paste the copied scheduling link. The calendar event list you just edited will now load with all the custom availability you set in step 4.
Take a moment to verify that the correct dates and times are displayed as available. This is also a good opportunity to test the Auto Forward functionality. As clients scroll through your calendar, the system will automatically navigate to the next open time slot, saving them the frustration of searching through unavailable dates manually.
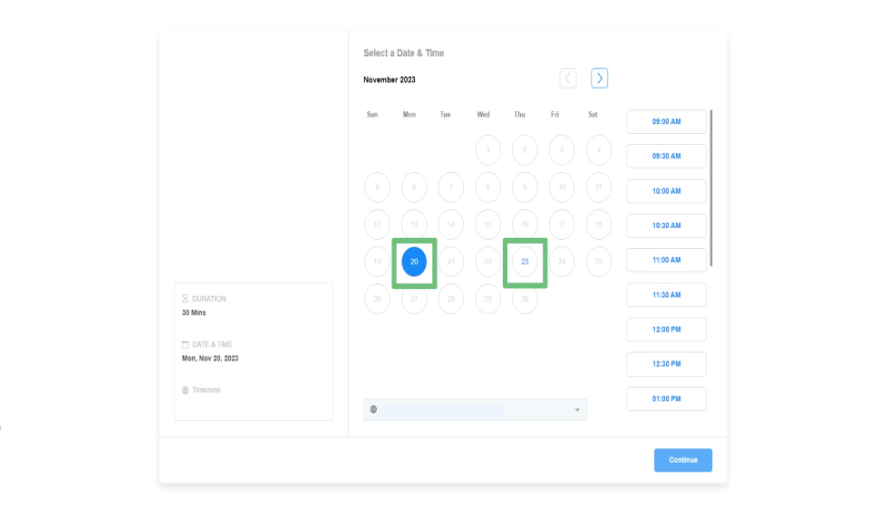
By following these steps, your calendar will be fully configured to leverage the Auto Forward feature, streamlining the scheduling process for both you and your clients.
Additional Benefits of Auto Forward
The Auto Forward feature is a game-changer in itself, but its true value is amplified when paired with the other robust tools in your Zapiy CRM. Here’s how you can make the most of it:
1. Sync with Team Availability
For businesses with multiple team members, Auto Forward works beautifully with shared team calendars. When a client books an appointment schedule, the system not only finds the next open time slot but also ensures it aligns with your team’s availability, avoiding scheduling conflicts after appointment confirmations.
2. Mobile-Friendly Design
Many clients book appointment schedules on their mobile devices. The Auto Forward feature is fully optimized for mobile devices, ensuring that the scheduling process is just the same as the desktop app.
3. Reduce No-Shows
By making it easier for clients to book a convenient meeting time through desktop or mobile apps, you’re indirectly reducing the chances of no-shows. When clients feel they have control over their scheduling, they’re more likely to honor their appointment duration.
Tips for Optimizing Your Calendar Widget
Your calendar is more than just a scheduling tool—it’s an opportunity to reflect your brand and provide a positive user experience. Here are some tips to optimize your calendar widget for maximum effectiveness:
1. Brand Your Calendar
Incorporate your logo, business colors, and font style into your calendar widget. A branded calendar creates a professional appearance and reinforces trust with your clients for a possibility of unlimited appointments.
2. Include Relevant Details
When clients book through your calendar, provide clear instructions or additional details. For example, include a brief description of the service they’re booking or any materials they should bring to the appointment.
3. Offer Multiple Appointment Types
Allow clients to choose from various types of appointment, such as consultations, follow-ups, or service calls. Each type can have its own availability settings, ensuring flexibility for you and convenience for your clients.
The Future of Scheduling with Zapiy
Scheduling shouldn’t be a headache—it should be an effortless interaction between your business and its clients. With the introduction of Auto Forward on Calendars, Zapiy continues to lead the way in providing intuitive, user-friendly CRM tools that simplify business operations and enhance client satisfaction.
Whether you’re a small business owner juggling multiple tasks or a growing enterprise with a high volume of appointments, this feature is designed to make your life easier. It’s not just about saving time—it’s about creating a better experience for everyone involved.
Ready to transform your scheduling process? Log in to your Zapiy CRM today and enable the Auto Forward feature on your calendars. Make booking process seamless, boost client satisfaction, and take one step closer to business efficiency like never before. Don’t wait—schedule smarter with Zapiy!
Let me know if you’d like further refinements or additional enhancements!


Youtube
Facebook
Instagram
LinkedIn
TikTok
X
Pinterest