Effortless Domain Management: Automatically Add WWW with Zapiy’s Enhanced Domain Connect
Managing a website or sales funnel today involves far more than just publishing content—it’s also about ensuring your domains are correctly configured and accessible. One common yet frequently overlooked detail in domain setup is handling the "www" subdomain. This small prefix can significantly affect user access and website consistency if not set up properly.
To address this, Zapiy made an advanced update in domain connection workflows. The update now introduces an automatic "Add WWW to Domain Connect" feature, enabling seamless DNS record creation for both root domains and subdomains, including "www". This feature is engineered for efficiency, usability, and technical accuracy, significantly simplifying the domain setup process for website owners, developers, and digital marketers alike.
This blog explores everything you need to know about the update: what it does, why it matters, how to use it, and the technical benefits it brings to your domain management strategy.
Effortless Domain Management: Automatically Add WWW with Zapiy’s Enhanced Domain Connect
What Is "Add WWW to Domain Connect"?
Why This Update Matters to Businesses and Developers
2. Improved Technical Consistency
3. User-Friendly for All Skill Levels
Step-by-Step Guide: How to Use the "Add WWW to Domain Connect" Feature
4. Authorize the Domain Connection
7. Configure Redirect Settings
Technical Considerations and Best Practices for Adding WWW to Domain Connect
What Is "Add WWW to Domain Connect"?
"Add WWW to Domain Connect" is an intelligent automation feature designed to streamline the process of connecting a domain to your website, sales funnel, or digital project. It works by automatically adding the necessary DNS (Domain Name System) records for both the root domain (such as example.com) and the "www" subdomain (like www.example.com) at the same time. This ensures your site remains accessible whether a user types in your domain with or without the “www” prefix.
Traditionally, setting up a domain required separate configurations for the root domain and the “www” subdomain. You had to manually create DNS entries and set up redirects to unify these access points. This process could be time-consuming and error-prone, especially for users who are unfamiliar with DNS management. The "Add WWW to Domain Connect" feature solves this by condensing multiple technical steps into a single, user-friendly action.
The functionality is integrated directly into the domain connection interface, often appearing as a simple toggle switch or checkbox labeled something like “Add WWW automatically.” When this option is enabled, the system not only provisions DNS records for both domain versions but also applies the necessary redirection rules—ensuring users who enter www.example.com or just example.com always reach the correct version of your site.
By automating this setup, the feature reduces manual workload, minimizes errors, and accelerates the go-live process. It’s a valuable addition for anyone setting up a new domain, rebranding, or launching marketing funnels, especially if technical simplicity and consistent website access are priorities.
Why This Update Matters to Businesses and Developers
The "Add WWW to Domain Connect" update is more than a minor technical tweak—it represents a significant step forward in how businesses and developers manage their web presence. By simplifying a previously manual and error-prone process, this update delivers key benefits that enhance productivity, consistency, and accessibility across skill levels.
1. Boosted Efficiency
Prior to this enhancement, setting up a domain connection required multiple steps. Users needed to add the root domain (e.g., example.com), then manually configure additional DNS records such as an A record or CNAME for the “www” version (e.g., www.example.com). After that, redirect rules had to be implemented to ensure visitors reached the correct site version, regardless of how they entered the URL. Each of these steps required technical know-how and introduced potential for misconfiguration or delays. Now, with a single checkbox, all of these tasks are completed automatically. This leads to faster deployments, reduced setup time, and fewer support issues.
2. Improved Technical Consistency
Uniform domain access is crucial for both SEO and user experience. Without proper configuration, websites can be accessed through multiple URLs, such as example.com and www.example.com, which can confuse search engines and fragment traffic analytics. This update ensures that DNS records and redirect rules are applied correctly, directing all traffic to the intended version of the site. As a result, businesses benefit from a clean, single canonical domain that preserves link equity and avoids duplicate content issues.
3. User-Friendly for All Skill Levels
Not everyone is comfortable navigating DNS terminology and configuration. This update removes that barrier by automating the complex parts of domain connection. Whether you’re a technical developer or a non-technical entrepreneur, you can now complete your domain setup with confidence and minimal effort.
Step-by-Step Guide: How to Use the "Add WWW to Domain Connect" Feature
Implementing this functionality is easy and straightforward. Here's how to get started:
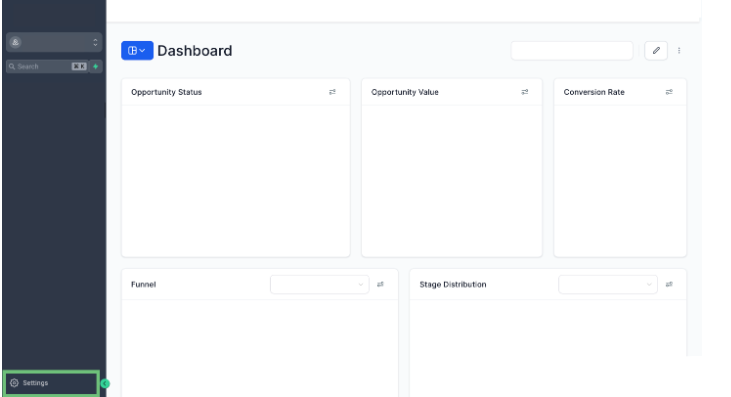
1. Go to Account Settings
Begin by logging into your account and navigating to the Settings section from your dashboard.
2. Open the Domains Tab
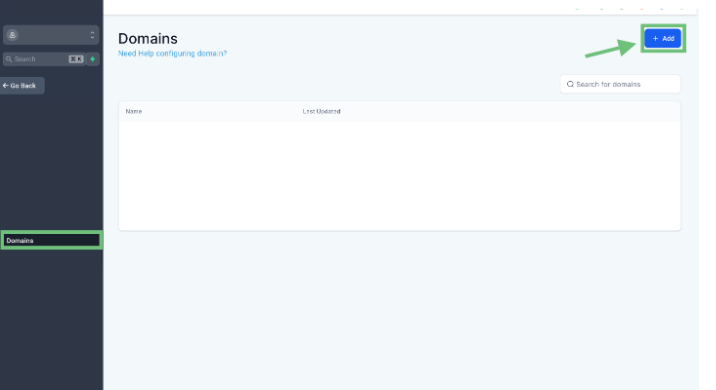
From the left-hand navigation menu, click on the “Domains” tab. Then, click the “+ Add” button to start connecting a new domain.
3. Enter Your Domain
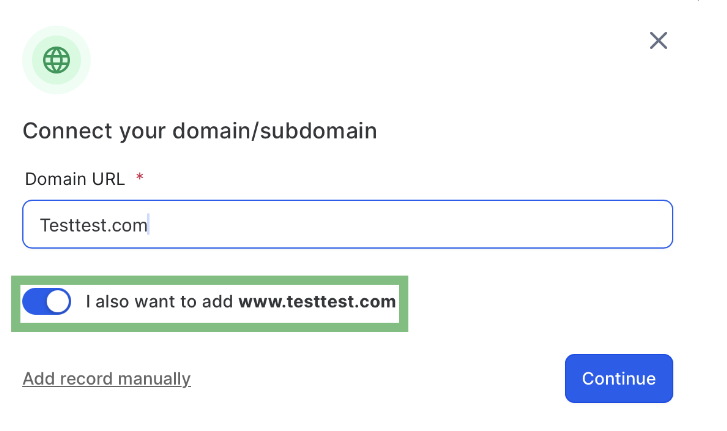
Type in your root domain (e.g., example.com) or any specific subdomain you want to use. You’ll see a toggle option that allows you to automatically add the “www” version. Enable this option if you want both versions included.
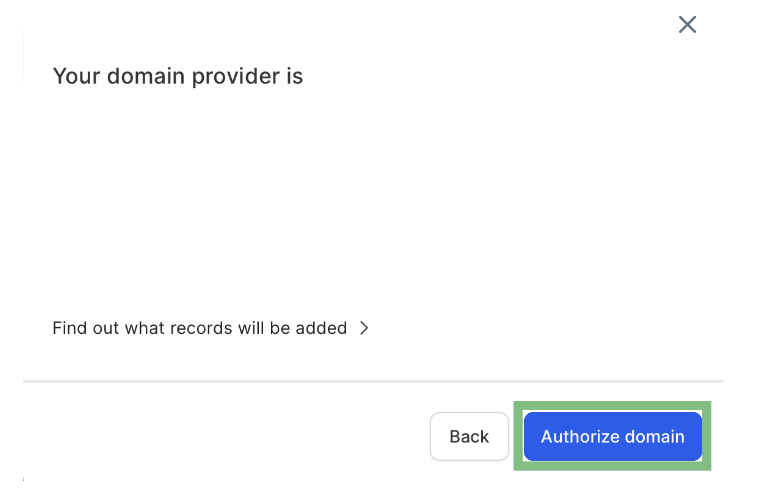
4. Authorize the Domain Connection
Click “Authorize” to verify and link your domain. The system will then automatically create the required DNS records for both the root and “www” subdomain versions.
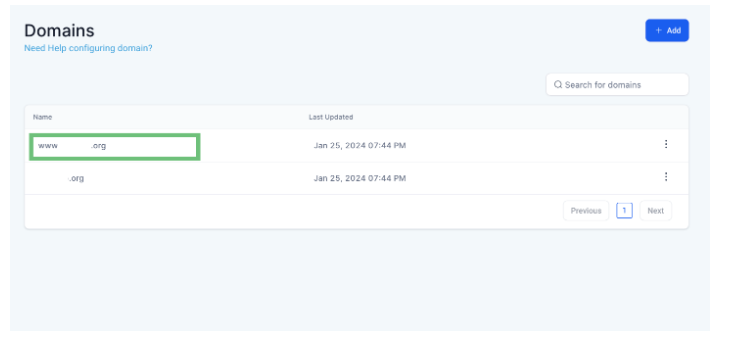
5. Verify Subdomain Addition
After the authorization process, you’ll see that the “www” version of your domain has been added automatically alongside the root domain.
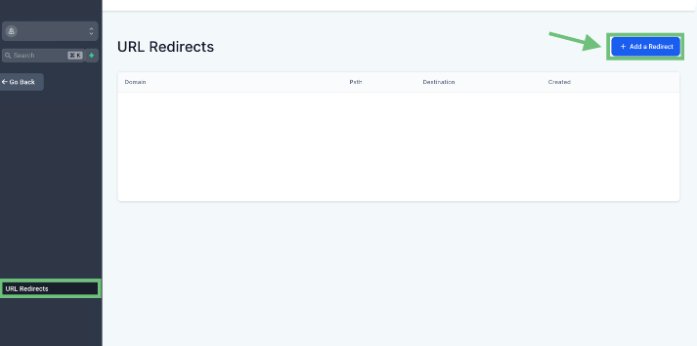
6. Set Up URL Redirection
Navigate to the URL Redirects section from the left menu and click “+ Add a Redirect.”
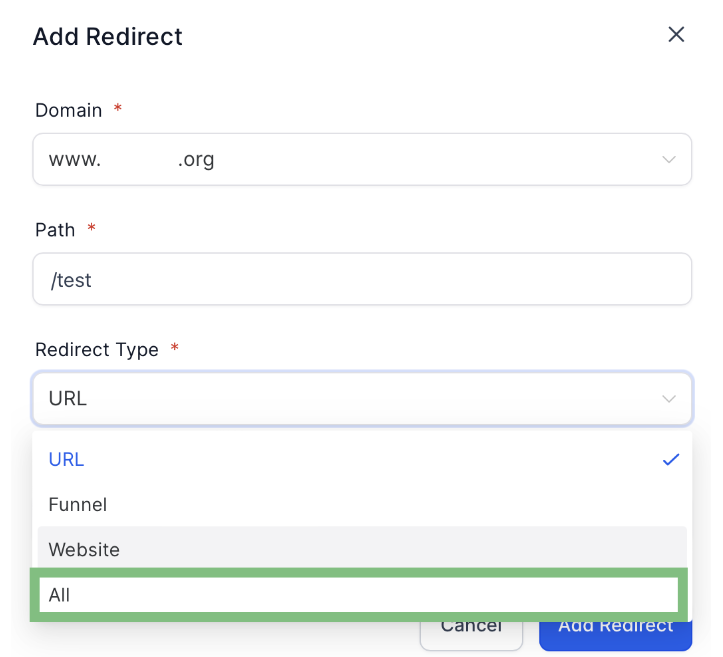
7. Configure Redirect Settings
Select the domain you’ve just added, set the Redirect Type to “ALL”, and click “Add Redirect” to ensure users are consistently directed to the preferred version of your website.
By following these simple steps, you can efficiently connect your domain and ensure seamless access across both root and “www” subdomain variations.
Technical Considerations and Best Practices for Adding WWW to Domain Connect
While the "Add WWW to Domain Connect" feature is designed to simplify domain setup, understanding the technical components behind it can help users make the most of its benefits. This section outlines key considerations and best practices to ensure optimal domain configuration.
DNS Records Involved
When connecting a domain, two primary DNS records come into play:
A Record: This points your root domain (e.g., example.com) to a specific IP address. It tells browsers where to find your website's hosting server.
CNAME Record: This is used for subdomains like www.example.com, allowing them to point to the same domain or CDN (Content Delivery Network) as the root domain. It acts as an alias rather than assigning a direct IP.
The automation handles these records for both versions of the domain, reducing the risk of misconfiguration.
Redirect Rules
For a seamless user experience and clean URL structure, redirect rules should be applied. These rules can be implemented at the application level or through your hosting/server settings. They ensure users typing either version of your domain (with or without “www”) are redirected to your preferred canonical version.
DNS Propagation Time
Once DNS records are updated, changes must propagate across global servers. This can take anywhere from a few minutes to 48 hours. During this period, users might experience temporary inconsistencies when accessing the site. It’s best to plan domain updates during off-peak hours to minimize disruption.
SSL Certificate Coverage
The automation also extends to SSL certificate issuance, ensuring that both example.com and www.example.com are covered. This helps maintain HTTPS access across all domain variations, preserving user trust and security.
SEO Benefits
Having consistent domain access improves SEO by:
Preventing duplicate content from existing on multiple domain versions.
Ensuring accurate tracking of visitor traffic in analytics tools.
Consolidating link equity by directing backlinks to a single canonical URL.
By following these best practices and understanding the technical foundation, users can confidently manage their domains while ensuring performance, security, and search visibility.
When Should You Use "www" in Your Domain?
Choosing between a root domain (e.g., example.com) and a "www" subdomain (e.g., www.example.com) often comes down to personal or branding preference, but there are technical and strategic factors worth considering.
The root domain is often seen as more modern and visually cleaner. It’s widely used by startups, personal brands, and minimalist websites seeking simplicity in their web addresses. However, some DNS providers place limitations on root domains, particularly when advanced routing or scalability is required.
On the other hand, the “www” subdomain is a traditional choice and can offer greater flexibility. It can provide better compatibility with third-party services and Content Delivery Networks (CDNs) and may allow more granular control over DNS and cookie handling in large-scale or enterprise-level environments.
From a technical standpoint, there’s no functional difference in how users access content, but consistency is key. Whichever version you choose, it’s essential to configure redirects and canonical tags to avoid duplicate content issues, SEO penalties, or user confusion.
The “Add WWW to Domain Connect” feature simplifies this process by ensuring both versions are supported and properly routed. It allows you to maintain a consistent web presence and user experience, regardless of how visitors type your domain.
Final Thoughts
This update marks a significant improvement in domain setup workflows by addressing a common but critical pain point: managing “www” subdomains. By automating DNS record inclusion and simplifying redirect configuration, it empowers users to get their websites or sales funnels live faster and with fewer complications.
Whether you're launching a landing page, connecting a custom domain to a funnel, or simply rebranding your site, this feature offers time-saving, error-reducing benefits. It’s one less technical hurdle between you and a fully functional web presence.
Start leveraging this automation now to streamline your domain management and ensure a consistent user experience across all access points. With Zapiy, you can implement this feature seamlessly within your CRM—no need for advanced technical knowledge or third-party DNS tools.
Experience smarter domain handling, simplified workflows, and faster launches—get started with Zapiy today.


Youtube
Facebook
Instagram
LinkedIn
TikTok
X
Pinterest