Monetizing Communities with Paid Groups: A Comprehensive Guide
As businesses, creators, and communities grow, the need for sustainable revenue streams becomes critical. Imagine having a thriving community where members not only engage but also financially contribute to its success. That’s where Paid Groups—a groundbreaking feature in our CRM—comes into play.
In this guide, we’ll walk you through the ins and outs of Paid Groups, why they matter, how they work, and even explore advanced ways to maximize their potential. By the end of this article, you'll be ready to turn your community into a powerful revenue-generating platform.
Monetizing Communities with Paid Groups: A Comprehensive Guide
⭐ Why Do Paid Groups Matter to Your Business?
1.Monetize Communities Effortlessly
2.Flexible Payment Options for Customization
3.Streamlined Access and Engagement
⭐ How to Use Paid Groups in 11 Detailed Steps
5. Choose Public or Private Group Settings
6. Set Up One-Time Payment Groups
7. Specify Payment Amount and Type
8. Set Up Recurring Subscription Groups
9. Set Up Recurring Subscriptions
10. Preview Your Recurring Payment Group
Advanced Strategies to Maximize Paid Groups
What Are Paid Groups?
Paid Groups are a newly introduced CRM feature that allows community admins or business owners to monetize a range of focus groups. With Paid Groups, you can set up a payment system for granting access to exclusive content, discussions, and experiences. These can include:
Public Groups: Accessible to all who pay the fee.
Private Groups: Exclusively available to users granted access post-payment.
Paid Groups work with flexible payment models, including one-time fees or recurring subscriptions. This ensures your community can accommodate different types of content and user expectations while keeping things simple for you to manage.
⭐ Why Do Paid Groups Matter to Your Business?
The Paid Groups feature brings transformative potential to your community operations. Here’s how it benefits your business:
1.Monetize Communities Effortlessly
Convert your hard-earned community engagement into a tangible revenue stream. Whether it’s exclusive content, premium discussions, or VIP-level features, Paid Groups allow you to generate sustainable income by offering valuable access.
2.Flexible Payment Options for Customization
Choose between a one-time payment for lifetime access or recurring subscriptions for ongoing revenue. This flexibility caters to diverse business needs, from single-course purchases to monthly memberships.
3.Streamlined Access and Engagement
Simplify the access process for users with seamless payment integration. Whether it’s automatic membership approval for Public Groups or admin-controlled approvals for Private Groups, Paid Groups ensure a hassle-free user experience that keeps your members engaged.
4.Increased Value for Members
When members pay for access, they’re more likely to value and engage with the content provided. Paid Groups foster a sense of exclusivity and importance, encouraging members to remain active and involved.
⭐ How to Use Paid Groups in 11 Detailed Steps
Setting up Paid Groups may seem intimidating at first, but with the streamlined features in our CRM, it’s an intuitive process. Below, we break it down into 11 simple yet comprehensive steps to help you launch your first Paid Group successfully.
1. Access the Membership Tab
Begin by navigating to theMembership Tabin the CRM dashboard’s side menu bar. Within this section, locate theCommunitiescategory and select the option to create a new group. This is where your Paid Group journey begins.
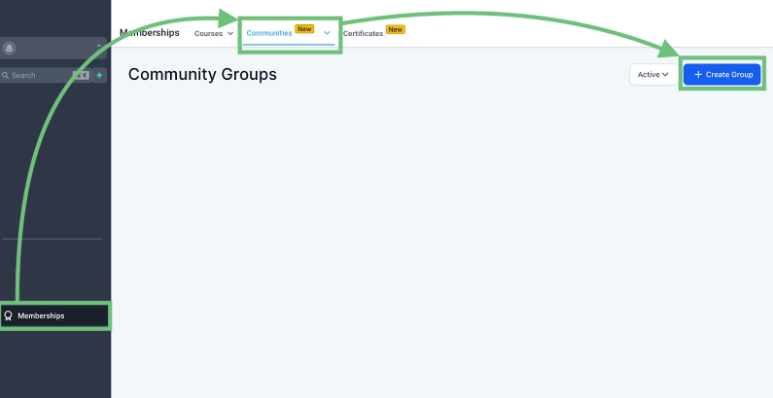
2. Create a New Group
Once inside the Communities section, click on the+ Create Groupbutton. This action will open a new window where you can begin setting up the foundational elements of your Paid Group.
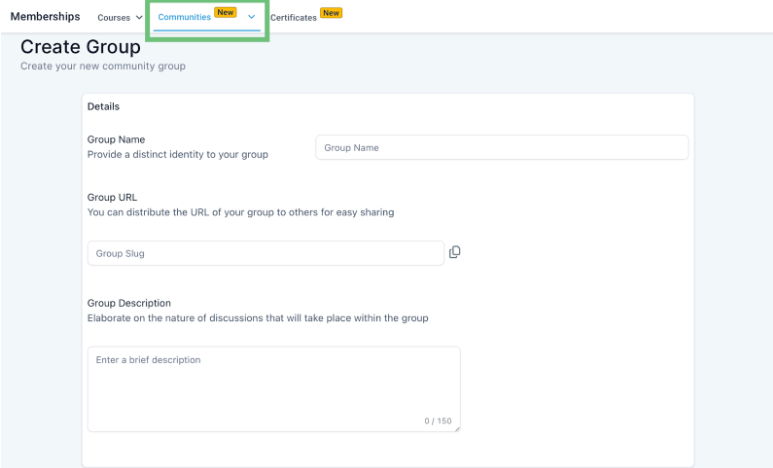
3. Fill Out Group Details
In the new window, you’ll need to provide all the essential details for your group. This includes:
TheGroup Name: Be clear and specific so members instantly understand the group’s purpose.
TheDescription: Highlight the exclusive value or content members can expect by joining your group.
Other Details: Add tags, select group categories, and ensure your group is discoverable (or hidden) based on your preference.
Take your time here to craft an enticing description that explains why your group is worth paying for.
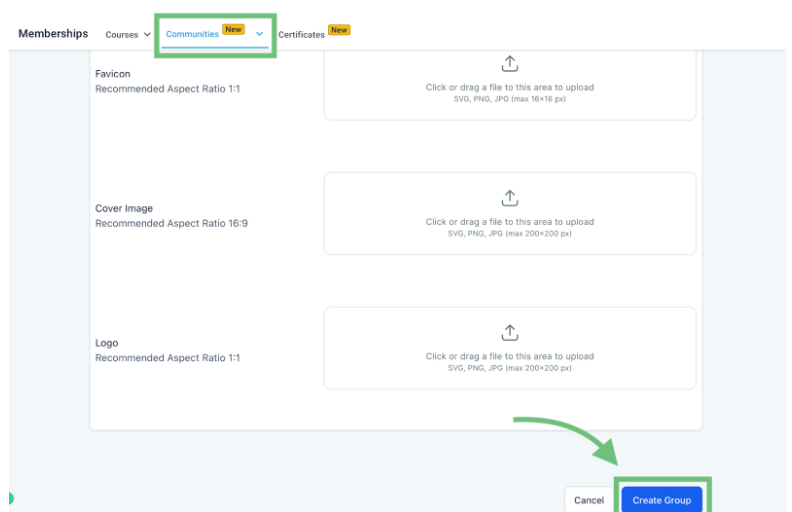
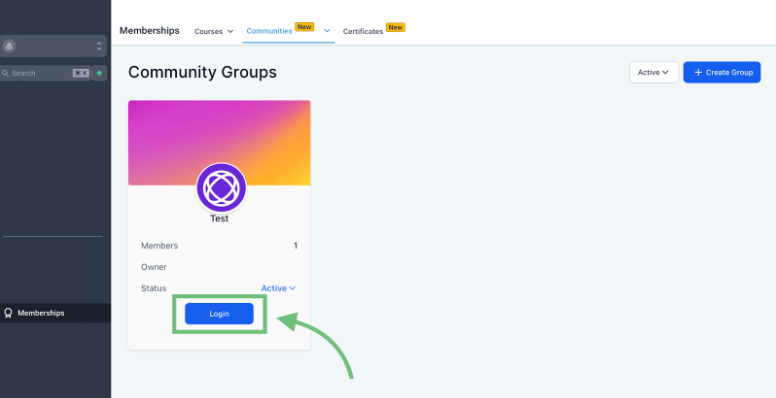
4. Log In to Your Group
Once your group has been successfully created, the next step is to log in to it. This allows you to access the group’s internal settings and begin customizing it for your audience. By logging in, you can start managing content, setting privacy levels, and ensuring that your group is optimized for Paid Group functionality. This step is essential to configure the group exactly as you want before members begin joining.
5. Choose Public or Private Group Settings
Now that your group is created, log in to the group to configure its privacy settings:
Public Groups: Members can automatically gain access upon payment, with no need for admin intervention.
Private Groups: Access is granted manually by the admin or owner after payment, giving you more control over membership.
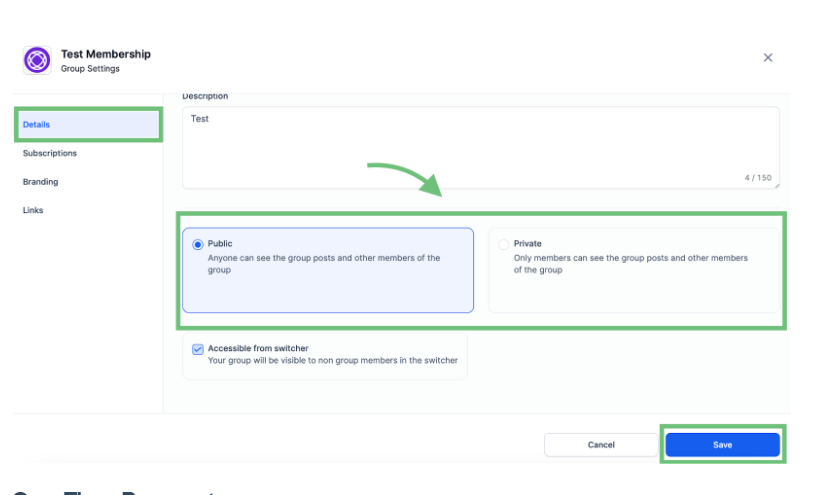
Carefully consider which option suits your group’s purpose. For example, a community offering VIP consulting services might benefit from Private Group settings, while a general resource-sharing group could work better as a Public Group.
6. Set Up One-Time Payment Groups
To enable paid access to your group, navigate toSettings > Subscriptions.
Click onAdd New Priceand specify the payment type asOne-Time Payment.
Enter the price amount that users will need to pay to gain unlimited, lifetime access to your group.
Once all the details are entered, clickAddand thenSaveto finalize the one-time payment setup.
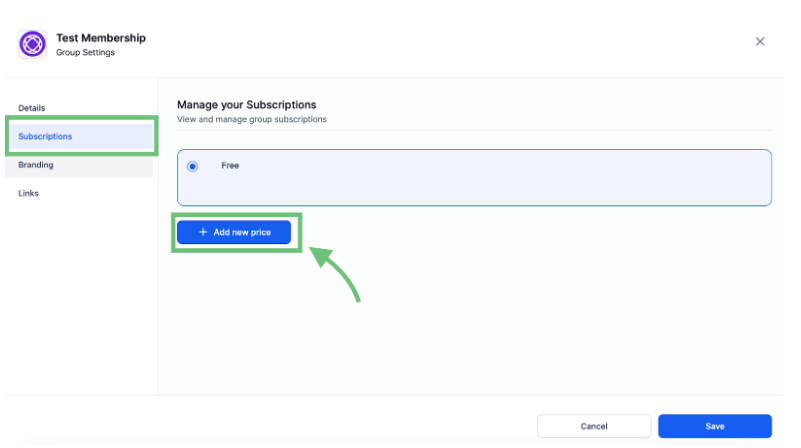
This is an excellent option for a range of focus groups offering a single course, resource package, or lifetime membership benefits.
7. Specify Payment Amount and Type
To create a paid group with a one-time payment model, navigate toSettings > Subscriptions. Click on the Add New Price button, then specify the payment type as One-Time Payment. Enter the exact amount you wish to charge for unlimited, lifetime access to the group.
Once all the required details are filled out, click Add to confirm the price and then Save to finalize the setup. This option is ideal for groups offering a one-time resource, course, or permanent membership benefits.

8. Set Up Recurring Subscription Groups
For groups requiring ongoing payments (e.g., monthly memberships or annual subscriptions), follow a similar process inSettings > Subscriptions:
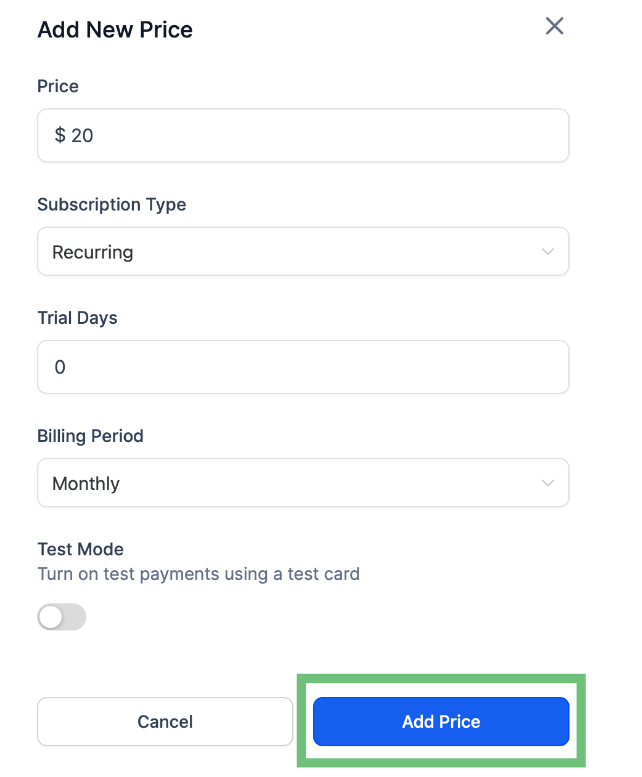
Click on Add New Priceand specify the type as Recurring Payment.
Enter the payment amount, trial period (if applicable), and billing frequency (monthly or annually).
After filling out these fields, click Add and Save.
Recurring payments are perfect for ongoing services like coaching, premium content updates, or long-term community access.
9. Set Up Recurring Subscriptions
To create a Paid Group with a recurring subscription model, navigate toSettings > Subscriptions.
Click on Add New Priceand specify the payment type as Recurring Payment. Enter the subscription amount and define the billing frequency as either monthly or annually. If you want to entice users, you can also set a trial period by specifying the number of trial days offered.
Once all the necessary details are entered, click Add and then Save. This option is ideal for groups that provide ongoing value, such as monthly content updates, coaching programs, or continuous access to premium resources.
10. Preview Your Recurring Payment Group
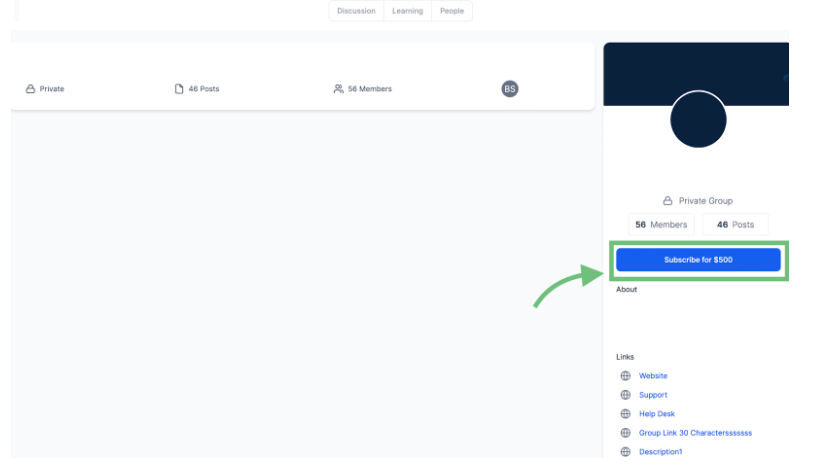
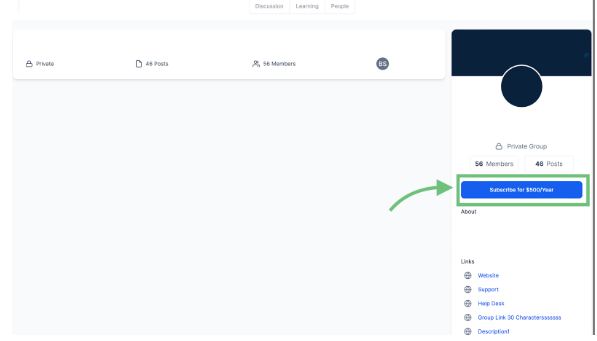
After completing the setup process for recurring payments, take a moment to preview how your Private Group will appear to potential members. The group page should prominently display the subscription options, clearly indicating the recurring payment terms, such as “$10/month” or “$100/year.”
This transparent presentation ensures that prospective members fully understand the ongoing payment commitment before subscribing. A polished and user-friendly preview of your group boosts credibility and encourages sign-ups, making it easy for customers to subscribe with confidence.
11. Group Access
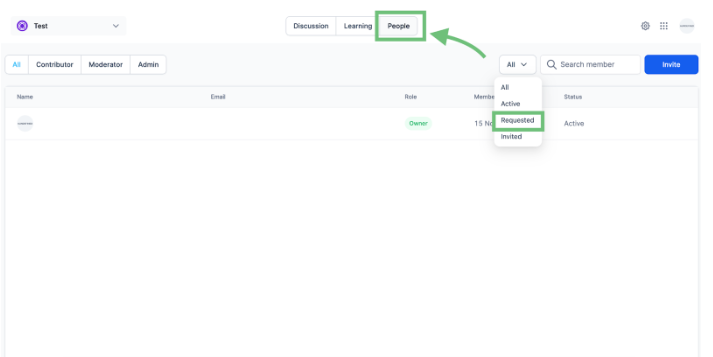
After payment is successfully processed, it's time to manage access for your group members, especially if you've set up a Private Group. To grant access, head over to the People Tabwithin your group’s settings. From there, use the filter option to view allRequestedmembers.
You will then have the ability to accept or deny each membership request based on their payment status. This step ensures that only verified, paying members are granted access to your exclusive group, maintaining the integrity and quality of your community.
By following these 11 steps, you’ll have a fully functional Paid Group up and running, ready to provide exclusive content, services, or experiences to paying members. Whether you choose one-time payments, recurring subscriptions, or a mix of both, Paid Groups are a game-changer for monetizing your community effectively.
Advanced Strategies to Maximize Paid Groups
1.Exclusive Member Perks
Keep your Paid Group members excited by offering additional perks, such as early access to digital products, exclusive discounts, or members-only events.
2.Gamify Group Membership
Encourage participation by introducing gamification elements like leaderboards, rewards for contributions, or badges for active members. Gamification keeps users engaged and coming back.
3.Upsell and Cross-Sell Opportunities
Leverage Paid Groups as a stepping stone for upselling. For example, if someone joins your group for basic access, offer them premium services, 1-on-1 consultations, or higher-tier memberships.
Conclusion: Unlock the Potential of Paid Groups
Paid Groups are more than just a revenue stream—they’re an opportunity to deliver exclusive value to your members while solidifying your community's role in their lives. From offering premium content to creating engaging experiences, the possibilities are endless.
At Zapiy, we’re committed to helping you succeed with Paid Groups. Our CRM ensures a seamless setup, efficient payment processing, and powerful tools to grow your community and your business.
Ready to monetize your community like never before? Contact Zapiy today to get started! 💼


Youtube
Facebook
Instagram
LinkedIn
TikTok
X
Pinterest